Warning: in-depth walkthroughs and lots of pictures ahead!
I recently bought my first unfinished guitar kit online and have been working intensely on it over the past couple days, now it's time to go back and evaluate what worked and what didn't, the good, the bad, and the ugly, and help you decide if one of these kits is a good idea for you as well.
Typically the first advice more experienced guitar builders give is to not cheap out on the initial parts and the wood. Oops. $100 semi-hollow from eBay? Challenge accepted.
If you're curious, the dealer I bought from was "TomTop" - it shipped in a week across the country with the cheapest FedEx option, and it all worked out just fine. $100 is unusually low for semi-hollow kits, which typically ran around $180-$200 for very similar looking kits. I can't comment on the quality of those, but I can't imagine enough difference between those and this kit to justify twice the price difference.
Initial thoughts unpacking; I was very happy to see a beautiful flame maple veneer top, as some of the pictures showed it with simply a flat basswood top. I was also pleasantly surprised by the triple binding around the edges and the single binding in the f-holes. Binding is necessary because they saved money by using just a veneer, but it's a nice looking touch for sure.
"Assembled" next to an SX Callisto for rough comparison. It has a nice sized body to it, but isn't at all heavy either owing to the semi hollow construction.
The body is primarily basswood, as are the back and sides as far as I know, while the top is some sort of laminate (maple?) with the thin maple veneer on top. The neck is mahogany, and not a bad piece of wood.
The fretboard was uninspiring but workable; frets were not level and the rosewood is uninteresting and slightly stained/glue-spotted.d
 |
| There were two slices in the fretboard that even slightly cut into the frets |
All in all, the neck is nothing special but not at all unusable. On to carving the headstock!
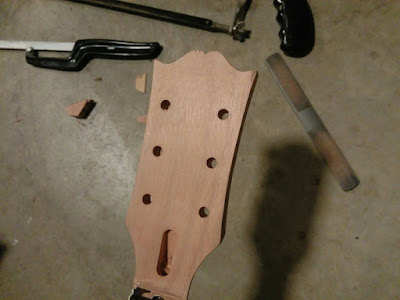
After drawing a rough "open book" design, I chopped out the bulk of the wood with a hacksaw, primitive man that I am.
Some elbow grease and a few different round files brought it to a nice even shape without too much work. Take your time if you want to avoid chipping, especially when using rasps. Fortunately the damage is hardly noticeable after the stain was applied.
 |
| Close up of the flame maple veneer |
One downside to this particular kit is that they did not drill out bridge post holes, leaving that to you to do. Clamp in the neck and trace two lines following the edge of the fretboard down onto the body (see below).
Next, figure out the scale length (usually 25.5" or 24.75") by measuring the distance to the 12th fret from the nut (this is 1/2 the scale length). Measure that distance down to find where to put your bridge and tailpiece studs.
 |
| With the bridge holes drilled |
Drilling these is a very important step to take slowly and get right. Drill small pilot holes exactly where the final bridge placement will be, then expand with a drill bit the size of the bushings. Typically they are 15/32nds; I used a 7/16ths bit and wiggled it around a little bit to loosen it up.
 |
| Test fitting |
 |
| Comparison; stock on top, brushed on bottom |
One touch I personally like adding is to give a brushed finish to the cheap hardware. I simply take a green Scotch Brite pad and 400 grit sandpaper and swipe back and forth until the plastic-y gloss is taken off and I'm happy with the look.
It remains to be heard how the pickups themselves perform, but I checked with an ohmmeter and they clocked in at 11k ohms for the bridge and 9k ohms for the neck. This is rather mild for humbuckers, especially cheap Chinese pickups, which tend to be wound hotter. Mild/vintage wound humbuckers are most likely best for a 335 style guitar, so it may well have been intentional design.
The neck joint wasn't tight against the guitar body; in fact, there was an asymmetric gap, with a bit more space on the left side. This was easy enough to fix with a popsicle stick and some Titebond. I can practically hear the tonewood purists groaning at this hack, but we must press onwards :)
The neck still needed to be sanded and shaped to taste at this point, so grab your files and sandpaper, it's back to the toolshed. The shape of the neck was asymmetric, with it thicker towards the bass side of the strings. This may or may not have been intentional; I read before that some guitarists prefer the feel. I prefer a flatter neck, and a few minutes with a flat file straightened that right out. After that, I worked the entire neck with 220, then 400 grit sandpaper.
My initial plan for leveling the frets was to use an actual level with sandpaper taped to the bottom. Nice idea but a flat file worked much better, save yourself the effort.
Optional but highly recommended step; tape up the fretboard. Simply apply tape, then use a razor blade along the frets to remove the excess. This will protect the fretboard from the bumps, scrapes, and filings that will come next.
This step was slightly painful for me, as a fan of jumbo frets. Take the file and, without applying much pressure, rub it up and down the frets, at a slight angle to the neck. Check with a ruler afterwards, your frets should all be level now.
Problem is that now the frets have flat tops, so we have to take our crowning file and round them out again. This crowning file was about $7 on eBay and worked alright; the nicer files are upwards of $100 from StewMac, and would just be silly to buy for a $100 guitar.
After leveling and crowning, it's a nice touch to round off the fret ends, especially on the treble side. I used a tiny flat file and worked around the edges until they became nice and spherical, then polished the whole side with 800 grit sandpaper and steel wool.
Steel wool across all the frets took away the scratches and made the frets fairly shiny once again.
At this point I flattened the fretboard with fine sandpaper and cleaned it out. Not sure how I feel about this, it did flatten the board nicely but left small scratch marks that I haven't removed yet.
After this, the frets are finally good to go, and I just went back and reshaped the neck heel to give better upper fret access. It's slightly less traditional but more comfortable, a change I have no problem making.
![[Mattwins]](https://blogger.googleusercontent.com/img/b/R29vZ2xl/AVvXsEgEy2dr7hX_nicvRhz4bxUFEoP_GPqBybD6lc0fwB83oIJo5s3tR3Qal9gBewkZ2l_egelA4NJ4SaMEWcs1l4QzdVYNdDcLO-8p8s4GEVdcMHt9xVrbDc2tGNaiOFFshWzgrUnPiNBUBfkU/s1600-r/logo2+-+Copy.png)


No comments :
Post a Comment
Questions, comments, concerns, complaints? Leave your thoughts below!