With the body sanded and prepped, it's time to break out the dyes and oils. Prep for eye candy.
To start, we need to find some decent dyes/stains in the colors we're looking for. I bought this set of five colors from Keda Dyes on eBay for just under $20. Not cheap for the size, but it's extremely concentrated stuff and a good variety of colors, with enough to do probably 2-5 guitars in.
The downside is it's an absolute mess to work with, and difficult to measure out precisely because you're using such small quantities of powder. Mixing the first bit is easy because you can see the change in the water's color, but after that it's a little more trial-and-error.
To make things easier, try out the mixes on some scrapwood of similar color to the stuff you're working on. I did a light fade from yellow to orange on the test piece above, similar to the final result on the guitar.
 |
| The kit before any dyes |
I opted to dye the neck first, owing to its simplicity and the fact that I'm not that particular about the shade the neck turns out to be. This was a little light and I added another "layer" of brown with a hint of red afterwards.
Easy peasy! Just take a rag, dip it in a bit of dye (wear gloves of course!), rub it into the grain, and wipe off the excess afterwards with a dry cloth to prevent splotches.
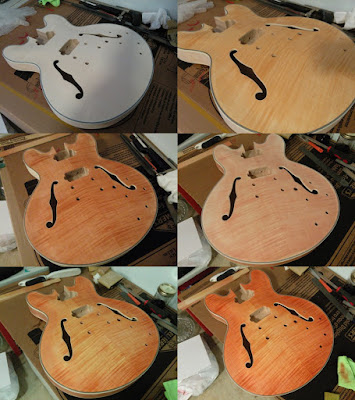
Back to the body. I gave it a light coat of golden brown to start, as something of a practice run. It looked rather nice but far from the finished product.
A paint stirrer worked perfectly to test the gradient and see how the dyed mixtures would look in the wood.
The next "coat" was a richer sort of amber-orange-brown. This looked quite nice too but I think I was mostly just happy to have a flame maple top to work with.
I didn't think too much of how the back would turn out, and just gave it the same brown-with-a-bit-of-red-so-mahogany-color-I-guess that I did to the neck. Works for me!
After giving the top at least several hours (24 hours preferably) to set, sand back that initial color to reveal a lot of the natural wood.
Because the grain is raised differently, after sanding the color will remain in the grain but not in between, really accenting the wood's figuring and making it look that much more exciting afterwards.
 |
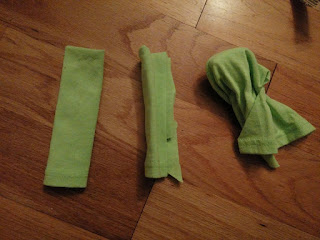
| The tools of the trade: a wide strip for the main color, a narrow strip for the burst, and a balled up piece for feathering |
Wow, big difference right away! This is with the main amber layer and several thin levels of reddish burst.
And with a few more passes with the red-orange, I have a burst color I'm quite happy with!
Back to the neck for now; it's dried and set, so ready for Tru Oil to bring out some intensity in the color and protect the wood.
I'm glad I took before and after pictures at this point, because it didn't feel like it made so big a difference at first! This is after just one coat; the color is richer, the grain better filled, and a slight bit of gloss coming around too!
Applying Tru Oil is as simple as wiping it on with your fingers and rubbing off the excess with a dry cloth. However, since we dyed the wood, the grain was raised again, and it works much better to use some 800 grit wet-or-dry sandpaper and sand with the Tru Oil as lubricant.
The wood dust that is sanded off will be rubbed back into the pores along with Tru Oil and fill the grain and pores, and since the dust is from the same wood, there's no noticeable color difference. If you want a gloss finish, sanding is not optional!
 |
| After first coat |
 |
| After second coat |
 |
| After third coat |
I read discussion online about using as many as 12-20 coats of Tru Oil and buffing for a perfect gloss finish. That sounds like an awful lot of work and oil; I was happy with the smooth semi-gloss I was able to get with only three or four coats on the neck.
 |
| After dyes, no oil |
 |
| One coat of Tru Oil, sanded in |
It was noticeably more difficult working on the body than the neck, especially as the 335 is a large bodied guitar. I'd definitely recommend Tru Oil for necks, but spraying might typically be the best option for bodies.
After the dyes dry and set, they appear rather dull and lifeless. No worries, any sort of clear coat will bring back the vibrancy right away.
 |
| After two coats of Tru Oil, but no sanding |
The Tru Oil seemed to just soak into the top without building any shine, and I found that it just wasn't going to happen without sanding. I was more hesitant to sand the top both because the colors are most vibrant and visible, and also because the flame veneer is quite thin, but it turned out just fine with some light sanding with the 800 grit and oil.
It's important to use a sanding block whenever possible; it worked great on the sides, but sometimes fingertips were just necessary to follow the contours of the arch.
 |
| The back has a natural satin feel, the neck a smooth semi-gloss |
After sanding the finish level, I added one more thin coat of Tru Oil with my fingers, and rubbed off the excess immediately. This gave a very nice slightly glossy look and satin feel. I could have gone for another few coats but a glossier look would also make the imperfections more noticeable, something I was fine doing without!
After letting the Tru Oil cure for 24 hours, it was time for the neck and body to finally unite. Grab your wood glue (or hide glue if you're chic), and clamp it up. I left it clamped for three hours, then didn't stress it for another 24 hours, and so far it's held up perfectly fine, but leaving it clamped for the full 24 hours wouldn't hurt either.
![[Mattwins]](https://blogger.googleusercontent.com/img/b/R29vZ2xl/AVvXsEgEy2dr7hX_nicvRhz4bxUFEoP_GPqBybD6lc0fwB83oIJo5s3tR3Qal9gBewkZ2l_egelA4NJ4SaMEWcs1l4QzdVYNdDcLO-8p8s4GEVdcMHt9xVrbDc2tGNaiOFFshWzgrUnPiNBUBfkU/s1600-r/logo2+-+Copy.png)


Mat, I recently got a similar kit and I'm facing the same problem with the loose neck tenon. Is it your kit holding on with the solution you came up? Is the guitar tone ok?
ReplyDeleteThank you.
I've found that a good joint with wood glue is just about as good as being made of a single piece of wood - I've had no problem with the shim on the side of the tenon.
ReplyDeleteAlso, for what it's worth, most of the contact between the neck and body is through the back of the neck, not the sides, so the tone and sustain should be fine as long as that joint is solid.
Good luck with your build!
This is a really good blog wish more people would read this , you offer some really good suggestions on DIY Electric Guitar Kit. Thanks for sharing.
ReplyDelete