![[Mattwins]](https://blogger.googleusercontent.com/img/b/R29vZ2xl/AVvXsEgEy2dr7hX_nicvRhz4bxUFEoP_GPqBybD6lc0fwB83oIJo5s3tR3Qal9gBewkZ2l_egelA4NJ4SaMEWcs1l4QzdVYNdDcLO-8p8s4GEVdcMHt9xVrbDc2tGNaiOFFshWzgrUnPiNBUBfkU/s1600-r/logo2+-+Copy.png)

In part II of this build, I go through shaping the chambering, gluing and shaping the body, and everything involved in getting a decent paintjob.


To pick up where we left off, we have the body slabs from before. I measured and drew the patterns I wanted to carve out on each.

Then, because I was using a jigsaw to carve out the patterns, I drilled out not only the holes I wanted, but also holes in the chambers I wanted to carve to get the jigsaw started. This actually went much faster than carving the outside of the guitar body because one sheet cuts way easier than five, lesson learned.
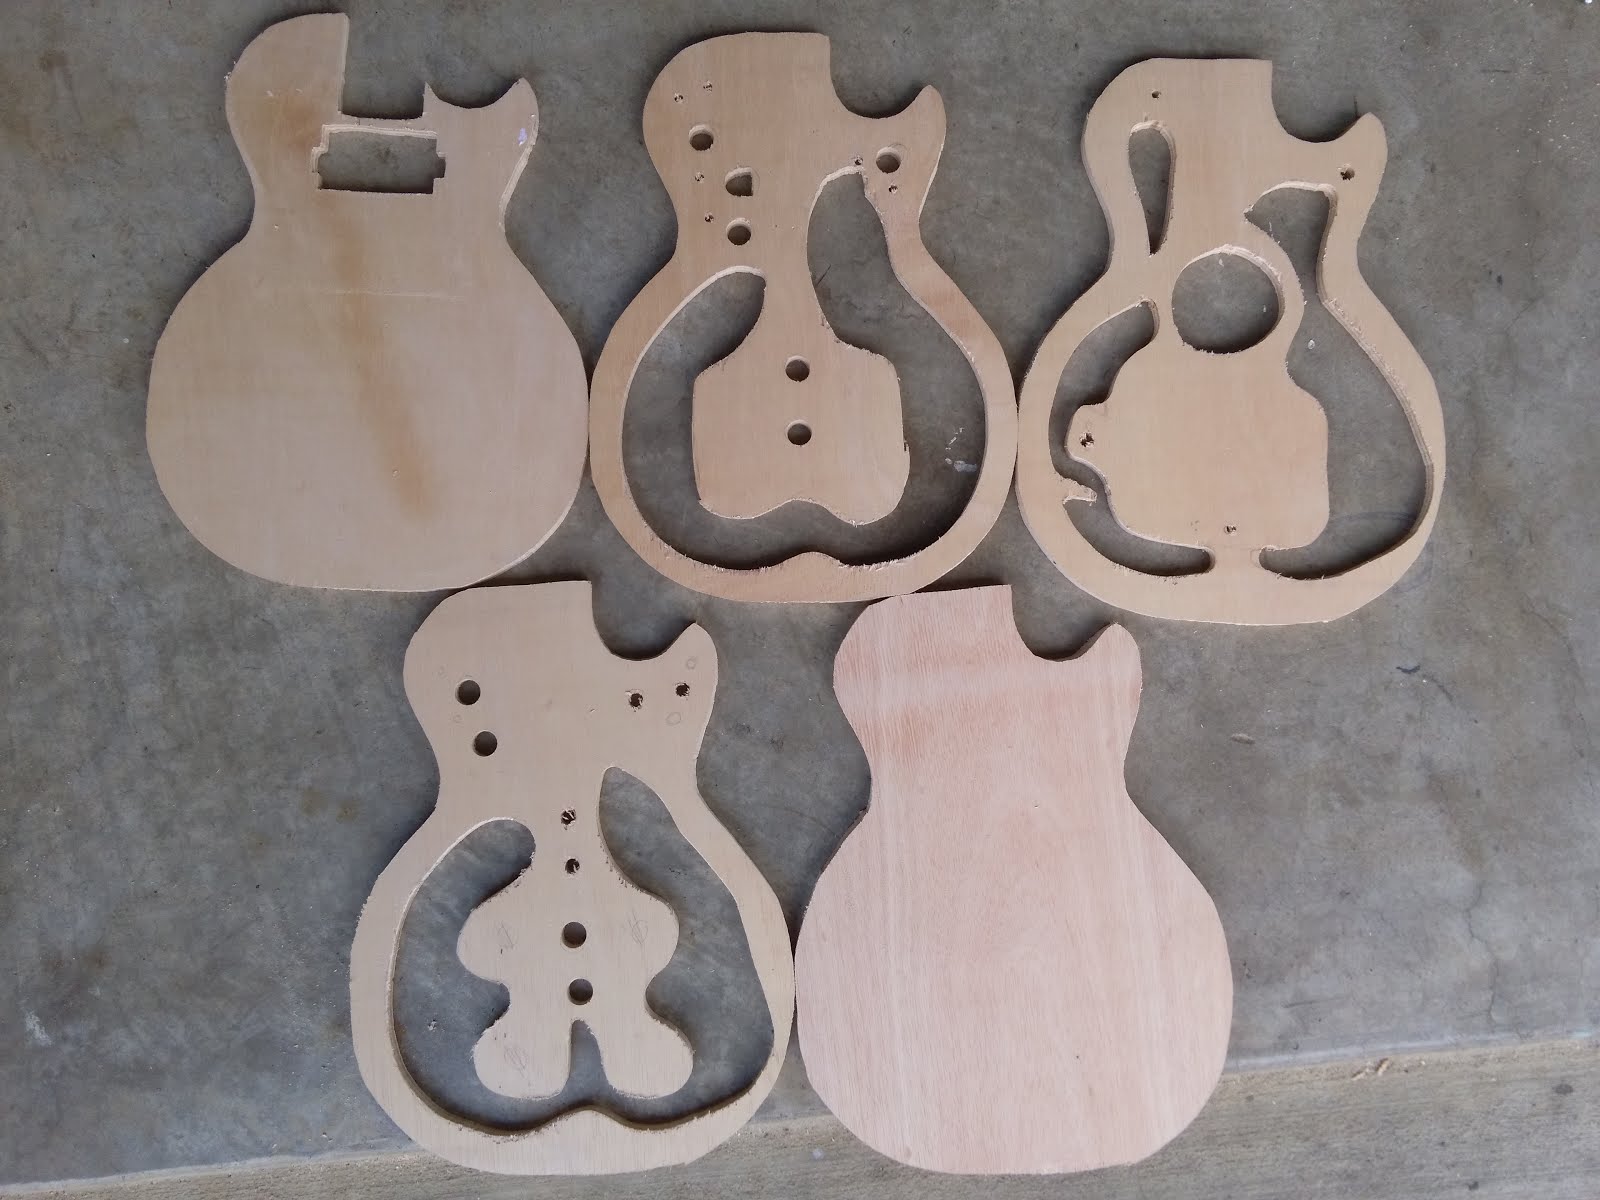

With all the chambers cut out, they fit together like a neat puzzle. Is there a real method to this madness? Sort of. I went for a few chambers, really one big chamber with two small chambers near the neck and tiny hole chambers scattered as well.

What's the reason for that big chunk left in the middle of each layer? Well we need some wood for the bridge and tailpiece anchors to grip, and really don't want those cracking, so I gave at least an inch of "safety wood" around each of those holes, hence the big middle section.

After the chambers are cut out and shaped to liking, it's time to glue it back together. I lined up the pieces as best as possible, then slathered each layer in Titebond wood glue before clamping them together. Lining up the slabs perfectly is crucial to saving you work in the long run and having the sides turn out nicely - each millimeter they are offset is a significant amount of sanding to the whole body in later stages.

I did an alright job with it all, some misalignment but nothing too bad, although it still shows in the sides unfortunately. Could I have sanded it out? Sure. Do I have the proper belt sanders, drum sanders, and many hours more to get it perfect? Nope. Lesson learned - unless you're perfectly happy with uneven sides, make sure you glue it just right.
On a side note, wood glue is ridiculously strong. I tested just a drop of wood glue on a few scraps from cutting the body, and could not pull them apart except with a flathead screwdriver and a hammer. The glue is definitely not going to be the weak link in your body.

Now it's time to measure the body and get the scale length, make sure the neck is aligned properly, and all that. Because I'm using a Strat type neck, this is going to be a 25.5" scale Les Paul, and the bridge and tailpiece have to be adjusted accordingly. (The effect of this may be to make the body look smaller, but a Strat neck is what I had).

Now mark and drill out those important anchor holes. I drilled the neck pocket holes as well at this time.

Time to get the output jack hole - this was tough to cut and turned out very sloppy with a spade bit, but luckily it's all covered by the jack plate so it's really quite irrelevant to the final product.

Time to fill in the worse cracks and dents with wood filler. This stuff worked quite well, it's a little putty that solidifies into sandable wood in an hour or so.

Before painting, you always want to make sure your paints are compatible. In my case, I used entirely Rustoleum enamels and they were perfectly compatible, but you should especially check if the brands or types differ. Do not mix lacquer with other paints - lacquer contains solvents that will dissolve them and you'll end up with ripples and bubbles like an antique painting that fell victim to a vinegar-and-baking-soda volcano. Enamel paints work fine and are easily available and easy to use for beginning hobbyists.

Starting out with a bit of black primer.

With a full coat of black primer. It becomes apparent now that the primer is not going to fill in the wood grain. If you want a wood grain finish, that's fine. I do not, so we're gonna have to backtrack and fill those pores and gaps like we should have from the start.

The proper technique is to use grain filler or sanding sealer. But sometimes you don't have the money for the proper solutions. An old can of polyurethane clear coat caught my eye. It's fast drying, extremely durable, and thick enough for scratches and pores with a few coats.

I painted on around 6 coats, giving around 10 minutes drying time between each. It worked quite well with what I had, and turned into an extremely durable surface in only an hour.

As you can see, brushstrokes show up quite a bit with this technique. Since I'm using it as a filler, it doesn't matter! Regardless, I alternated direction of brushstrokes with each coat for an even finish.

Time to sand it back! I used 120 followed by 240 grit, if I recall correctly. That may vary based on the thickness of paint you put on. USE A SANDING BLOCK.

Now we can see this is a (more or less) truly level surface, virtually no sign of grain showing through. It also took care of scratches and even a mark left by a clamp in the gluing process.

In the meantime, a few parts came in! Here are the new tuners, cheap tuners from Amazon that work pretty well at a great value. If your guitar isn't staying in tune, it's much more likely due to the nut or bridge than the tuners.

And here we have the pickup rings as well, I only need one but this four pack of solid metal rings was only $6, and look and work quite nicely.

Putting on a new coat of primer/paint. Here's where the paint problems start.

Ugh! The can of primer had apparently been sitting in the Lowe's a little too long, and while it worked at first, the pressure ran low before the paint was half gone, and splatters start.

I should mention at this point my painting method - I used a small wooden rod through the neck screw hole, suspended from the ceiling by a rope. A clove hitch on one end held it together and a bowline on the other end was easier to slip off for adjustments and sanding stages.

Moving on from the primer to the Rustoleum Professional Enamel paint, this stuff worked very nicely, especially at first.
Beautiful wet gloss finish, but with some orange peel and a few drips from the primer underneath. If I had known, I probably should have moved on to the clear coat at this stage. Alas, I moved it before I should have and got fingerprints on it, and wanted to try for a better base coat still.

Hung it up to dry, let it cure for 36 hours and it was quite strong enough to the fingernail test afterwards.

Using 400 grit wet/dry sandpaper, I took off the orange peel and the tiny drips underneath. Washed it off, wiped it down, and let it dry.

Unfortunately, it seems that at least two problems happened. One, the spray is not as consistent when the can is running low. Two, the extra flat surface left by the 400 grit actually seemed to make runs much worse than the 240 grit, which might have left a little more forgiving surface for paint to stick to and not run off. Third, I wasn't as even and methodical applying the paint, in part because of the can's beginning inconsistencies.

Nonetheless, most of it still turned out nicely, and with less orange peel than before. I'm not thrilled with it, but satisfied enough. The only real blemish was one run on the back. If I were going for a professional finish, I'd have let it cure again, sanded it back, and bought a new can to refinish in. Given the already sloppy condition of the sides and my desperate need for money for next semester, I opted to just live with a few blemishes.

After that, clear coating! I used an entire can of Rustoleum Crystal Clear enamel spray to give it a thick clear coat, done in six coats. The first coat I applied very lightly and let sit for fifteen minutes to develop a tack, then applied subsequent coats heavier to cover it all.

Once you finish your clear coats, it'll need to cure before wet sanding. This depends very much on what type of paint you use - many will be okay with around 24 hours to cure, most should have at least 48 hours. A lacquer finish might take months to cure. If you wet sand before it's cure, the finish could fog up and turn hazy as the paint continues to cure. Now it's time for me to give it time to cure, and when we come back it'll be time for the final finish sanding, wiring, and assembly!
Part I
Part I
No comments :
Post a Comment
Questions, comments, concerns, complaints? Leave your thoughts below!